Sunday 11 December 2016

Dolls and Daydreams


During their Black Friday sale, I ordered several patterns from Dolls and Daydreams.

Dolls and Daydreams specialize in Fun & Easy Step by Step Photo Tutorial Patterns so that even a beginner sewer will be able to make Dolls, Softies and Doll Clothes just like mine on a Sewing or Embroidery Machine!
 You can either get a regular sewing pattern or a pattern files specifically to be used in an embroidery machine.

I wasn't sure which to try first.  While I'm sure I probably could easily manage a sewing pattern, for some reason I bought all machine embroidery files which at first glance look complicated as all heck.

Each pattern comes as a digital download including files and an instruction PDF.  I read over the PDF of the patterns I purchased a few times before I decided to make the Reindeer first.

This is an ITH (In The Hoop) embroidery project, meaning the whole thing is made with the embroidery machine.  I sat down to find fabrics for it and realized I had almost no Christmas prints, so we pulled together a little something shabby chic.  I used regular quilting cotton as the body instead of a fleece or a minky and it turned out great.  I still just need to sew up her little body and find her a ribbon for her neck.

 In all, it took me about 30 minutes of work.  I had to stop a few times to reread the instructions, but not counting that, it was a very quick project.  I don't have much felt on hand to have coordinated the antlers better, but I think it looks pretty cute!

Sunday 4 December 2016

Scrundies

The name makes me cringe!  I'm not sure why...

Scrundies, or Scrundlewear, are the creation of Stitch Upon a Time.  They are an all-in-one pattern for undies that are supposed to be super comfortable and easy to sew.

Sewing underwear has never been easier! With the guidance of this pattern, you can sew a drawer full of undies in just a day! The different shapes of the undies suit most body types and there are different styles for your comfort. After wearing a pair of Scrundlewear, you won’t want a store bought pair ever again. The wide band option is so comfortable, you can barely tell you’re wearing them. This pattern is also great for making swimming suit bottoms.
I thought, well hey, ok.  Let's give this a go!  I recently found a serger at the local thrift store that was in super great shape, so I figured I was good to go!

I went back and forth with the sizes and ended up cutting out a large, which in hindsight I should have really guessed was too big.  The pieces looked HUGE when I cut them and the fabric you use is a knit, so it stretches, so.  That was a total common sense fail on my part.  I also didn't have the right contrast fabric, I used a wonky poly ribbing that NOW I understand wasn't right for the project.  User error aside?  I really do love this pattern!

The serger itself has a bit of a learning curve, but the pattern is well drafted and very easy to follow.  The actual Scrundies are comfortable, but the waist is floppy and the bum saggy 😝  Both are an easy fix for the next pair I attempt!

I cut the boyshorts, which are a nice fit for me, they tend to be more 'cheeky' or European fit than an American panty is.  Beginning to end it took me about half an hour which surprised me.  The zig zag topstitch actually took the longest!

Rest assured, Ill report back as soon as I make another pair!

Tuesday 29 November 2016

Spoonflower

Not too long ago I ordered a pattern from Sprout, which I plan on posting about soon.  But after it arrived I placed an order with it's companion site, Spoonflower.  They were having a buy one, get one half off sale on FQs so I randomly selected a bunch I liked.


Spoonflower is a really awesome concept.  They offer custom fabric printing.  Basically you can chose any design on the site (or design and upload your own!) and have it printed on one of 20 different fabrics from wovens to knits to fleeces and canvas.

I ordered some designs already available on the site, but I did upload one of my own to give it a test and I'll follow up with that, later!

It takes a while for your order to process, which is understandable.  Each design needs to be print on each separate fabric you ordered.  It seems daunting, but my order arrived in about three weeks, all the way here.  I ordered on 7 November, it shipped on 17 November, and arrived yesterday 28 November (which is a little longer shipping wise than usual, but it's the holidays).   The prices are a little on the high side, but considering you're ordering 100% custom fabric it's well worth it.

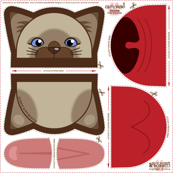
The site is ridiculously inspiring.  There are so many prints to chose from, but also panels!  There are some amazing designers who create single FQ panels of ornaments and stocking and plushies and coin purses and little dolls!  I ordered this little doll to make for Christmas.
These are some other panels they have!


πŸ™ Before my order even shipped I went back and ordered a full yard of the one dark octopus fabric because I have something curious in mind for it.

Another amazing thing is that there is a coordinating line of fabrics that match some Urban Threads embroidery design!

Also included was a swatch of another fabric type, which I thought was really very handy as I am still new to all the different sorts!

They recently had a Black Friday/Cyber Monday sale (πŸ’₯it's been extended through today!!!πŸ’₯) as well and I ordered four more full yards of fabrics in various prints and bases, including knit and satin!  I'm so excited.

Friday 25 November 2016

Lace Snowflakes

I recently discovered I could embroidery lace.  At first, I just couldn't wrap my head around how it worked!  I've done a few designs now and it makes perfect sense... mostly.  I ran across this on the Urban Threads site and figured I'd give it a go!


Here is a video from my IG, it shows the foundation stitches of a snowflake.  It's embroidered on wash-away film that smells just like what it probably is, a film of dried glue!

This is the result, the final snowflake still in the hoop.
The film is clear, it's just sitting on my white worktop.  I used a bit darker of a blue as my background then in the sample, but I'm very happy with it.

I searched around Etsy and ended up finding another pattern that I liked, too.  It's designed with little spaces for crystals, and while I don't have any, I think it still looks great!


I embroidered them both with just poly embroidery thread from ARC, with the same thread in the bobbin.  I used Rinse Away from Sulky and once they were stitched out, just trimmed the stabalizer close and then let them soak in some water until they were 'free'. 

They're a lovely weight, not flimsy at all, and while I did buy some starch to spray them with to stiffen them up to hang as ornaments, I don't think I need to use it!

I have a few other lace designs I hope to try over the next couple of days.  They are time consuming to stitch, although really all there is to do is watch the machine.  They just take longer than average to complete!

Monday 21 November 2016

Experidery

I did some experimental embroidery over the weekend.  It's obvious I'm going to need to invest in some sore of program to resize, etc, some designs.  I have a pretty basic machine that will go up to 5x7, but there are a lot of designs I actually want a little smaller than 4x4 which is the smallest design most companies make.

See that dot there under the right thumb?  That's supposed to be the top center of my design, but by the time I got it hooped and pulled tight I was so off!  I'll need to practice more to be able to align more complicated designs.
This is a little better, but you can see here how this design would work better if it was a bit smaller!  It sort of folds over the end of the flap and ends up around the back.

All in due time.


Saturday 19 November 2016

Ruffled Wristlet

Scrolling through my IG feed (are you seeing a pattern here?) I noticed the Ruffled Wristlet pattern posted by @cpeicheff  aka Carla's Creations.

The pattern is available on Craftsy, which is an awesome site to find, purchase, and easily download a lot of different patterns.

It was pretty cute and looked like a great way to experiment with some of the bigger scraps I have hanging around.

The pattern doesn't come with any 'pieces', that is, it's simply the directions for cutting and sewing, which I wasn't sure about.  Turns out now that I have the pattern memorized, it's great not to have to fuss with pattern pieces, I can cut sit and cut scraps with a ruler and rotary cutter.


I used gray metallic Essex Linen as the base and the ruffled accent is from the Holiday Traditions collection from Henry Glass.  It's actually gray, too, but for some reason looks blue!

So far I've made 5 of them, I have a couple more cut out, just waiting.  I snagged these pictures from my IG.

Some of my ruffled pieces are a little shorter than the 20 inches the pattern calls for, but I find this doesn't make too much of a difference.  They are rather easy to sew, no fancy seams, darts, or anything so it would be good for a beginner, the only tricky part is the gathering, but it's simple to master.

I have posted a couple of questions to the designer under her IG pictures, but they were never answered.  She seems to only comment a select few people, which I suppose is understandable and I was able to work out the answers myself so it's nothing too complicated.

Friday 18 November 2016

Near and Deer

I've really been enjoying my embroidery machine!  I had originally got it on a whim, with the idea of launching a second business, which while still an option, isn't going to happen any time soon.

Rambling around IG I ran across a company called Urban Threads which creates 'alternative' themed embroidery art and designs that are perfectly amazing.

They recently had a 'buy one, get one half off' sale and I admit to going overboard.  One of the designs I purchased was this gorgeous deer.

I wasn't sure what I would do with it, it was just pretty.  I ended up pairing it with some rustic cotton prints that I wouldn't normally use in this 241 Tote from Noodlehead.


 I embroidered on Flax Essex Linen in a brown variegated thread from Aurafil (4671) and accented with cotton prints from the Moose Lodge collection by Henry Glass.

 The pattern is for an Advanced Beginner/Intermediate sewer, which I didn't realize until I brought the link over just now.  I managed it quite well!  The curved inset pockets fit in beautifully with no puckers or issues!

The most challenging part was lining up the design.  I embroidered it on a piece of linen and then traced the pattern out flat and then fussed with it to get it placed on the front like I wanted.  It's not quite centered horizontally because the antlers make it quite tall.

Overall I am very pleased with it!  It's not my usual style, but it's very cute.